Installation
Installation is relatively straightforward and consists of four main stages:
- upload the madCMS files to your hosting space
- set up your MySql database on your hosting space
- update the madCMS config file with the parameters specific to your hosting
- run the madCMS install file
Remember that madCMS is free, so the amount of support you will get from me is limited. Nothing is ever perfect, but the code base is stable and is being used on a number of websites with no reported problems. Development of the core madCMS code has plateaued, unless someone discovers a bug. The only further development I am doing is creating specific custom modules as required by clients.
I am happy to assist with installation problems where I can, but you will need to be able to troubleshoot any issues related to peculiarities with your own hosting space.
1) Unpack and upload Files
Download the zip file of the latest stable version of code and unpack the files to your PC, making sure to preserve the directory structure and filenames.
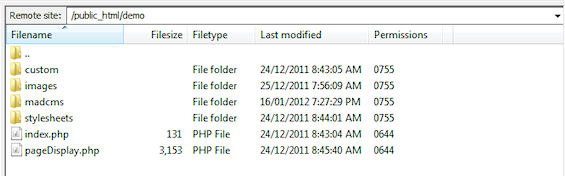
Using the method of your choice (eg: FTP client, web client, etc) upload all the files onto your web hosting space, again making sure you preserve the directory structure and filenames.
Generally, file permissions should be 755 on folders and 644 on files.
2) Setup your Database
Create an (empty) MySql database on your web hosting space. Most hosting companies provide some sort of custom web interface for you to do this.

If your hosting company provides you with a shared instance of MySql, your database name may be prefixed with your account name (eg: billy78_databasename).
You will also need to create a database user and password and associate them to your database. Your hosting company may also predefine users and passwords for your databases.
3) Edit the Configuration File
With the files uploaded and your empty database created, you are ready to edit the configuration file [configurationSettings.php] to suit your site.
These variables in the configuration file will need to be set:
-----------------------------------------------------------------------
$setusername (your choice of madCMS Administrator User ID)
$pass (your choice of madCMS Admin Password)
$cookiename (your choice of session cookie name)
$expirytime (your choice of expiry time for the password - in seconds)
$msg (your choice of error message displayed when password is incorrect)
-----------------------------------------------------------------------
$dbhost (MySQL host - usually 'localhost', but check with your hosting provider)
$dbname (MySQL database name)
$dbuser (MySQL user name)
$dbpass (MySQL password)
-----------------------------------------------------------------------
$emailRecipient1 (your choice of primary recipient of e-mail notifications)
$emailRecipient2 (your choice of secondary recipient - if not reqd, set to ' ')
-----------------------------------------------------------------------
$modFiles ("yes" if Files Manager is to be enabled)
$modEvents ("yes" if Event Manager is to be enabled)
$modNews ("yes" if News Manager is to be enabled)
$modShop ("yes" if Shop Manager is to be enabled)
-----------------------------------------------------------------------
$quickImageWidth (size, in pixels, of "QuickImages automatically inserted in Pages)
$fullImageWidth (size, in pixels, of large images created by some modules, eg: SHOP)
$thumbImageWidth (size, in pixels, of square thumbnails for some Modules)
-----------------------------------------------------------------------
$siteurl (URL of live website eg: www.yoursite.com.au)
----------------------------------------------------------------------- $shopCategories (delimited list of categories used in SHOP module)
-----------------------------------------------------------------------
All other variables in the configuration file should be left as the default values.
Edit the configurationSettings.php file on your local PC and upload it to the hosting webserver.It is recommended that the file permissions of this file be set to 600, if your host supports this. You may wish to make a backup copy of the original file before you edit it.
4) Run _install.php
Once the editied config file has been uploaded, you are ready to create your database tables in the database you created at step 2.
In the "madcms" folder, there is a file called _install.php. Running this file will set up all the necessary tables in your database as well as populate some default values.
To run this file, open a webbrowser and type in the URL of the file (eg: http://www.yoursite.com.au/madcms/_install.php)
If the tables are set up sucessfully, a confirmation message will be displayed along with a link to the login page of madCMS Administration.
After sucessfull installation, don't foget to delete _install.php from your live site.
Your live website should look something like this:

Ok, so now you have a default installation of madCMS.
Unless, you realy, really like the default appearance of your site, you will probably want to modify the "look and feel", so check out the Developers' Notes.
I am happy to help you with any questions you may have about changing the "look and feel" of your website, but support of madCMS does not extend to teaching you how to create Cascading Styles Sheets (CSS) - there are many excellent references on the web for this :)
Thoughts...
And yet, am I anything more than the dread that others have of me? (Sartre)


![]()