Creating, Editing & Deleting Pages
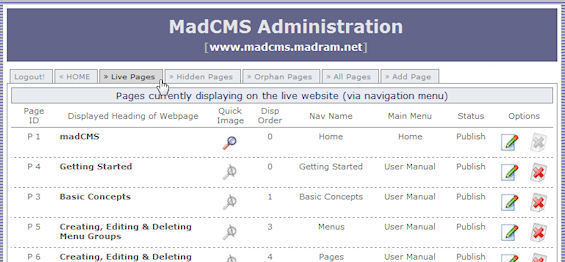
Creating or editing pages on your website is easy. Select the "Pages" tab on the admin console to see the Live Pages - those pages currently displaying on your live website.
![]()
You will notice that there are other tabs for you to list Hidden Pages and Orphan Pages - more about those later.

When madCMS was installed for your website, a default Homepage was automatically created. You can't delete this mandatory page (your site always has to have at least one page!), but you can edit its content. The default Homepage also has a default embedded "Quickimage" that you can also edit or replace.
Creating (Adding) Pages
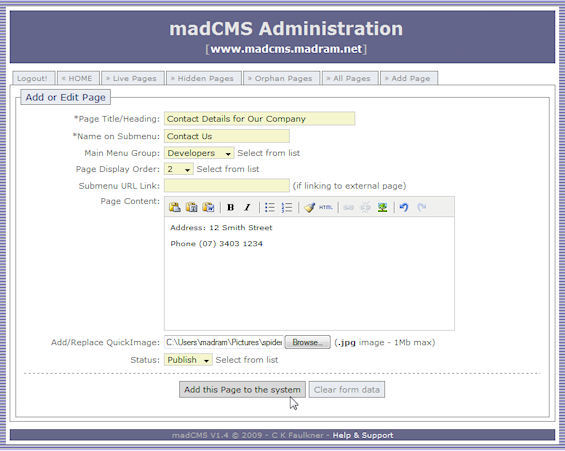
Click on the “Add Page” tab to display the “Add/Edit Page” screen.

Page Title/Heading
This is the Title or Heading that will appear at the top of you page when it displays on you live website.
Name on Submenu
If there is more than one Page associated with a Main Menu Group, a drop-down navigation submenu will be automatically generated off the Main Menu Group, containing links to all the Pages.
What you enter in the “Name on Submenu” field will be the link that appears on the navigation submenu for that page. Just like the names you gave the Main Menu Group, the Name on Submenu should be one or two short words. For example, if your Page Title heading is "About our Company", the Name on Submenu might just be "About".
Main Menu Group
Select from the drop-down list the Main Menu Group with which you want this Page to be associated.
Page Display Order
Just like the display order for your Main Menu Group, this determines the order in which your Page links will appear on the generated Submenu.
But there is an important twist! If you set the Page Display Order to 0, then the link to this page will be on the Main Menu and it won't appear in the Submenu.
If, for example, you have 4 pages associated with a Main Menu Group, and you have set the Display Order for these pages to be 0, 1, 2, 3 then you will have a link on the Main Menu to the page with Display Order = 0, while the links to the other three pages will appear on the Sub-menu.
If Pages have the same display order set, then they will display on the Submenu in alphabetical order.
Submenu URL Link
Sometimes you may want the page you create to do nothing more than redirect to another website or file outside of madCMS. In such cases, type the URL of the target webpage here.
The page navigation name will then appear on the drop-down submenu of the live website and clicking on it will take you to the other website or webpage.
You may find it useful to put (redirect) in the Page Title/Heading field to remind you this is a redirected page. The Page Content field won't display of course, so feel free to add notes to yourself about the page to which you are redirecting.
Although this function is usually used to redirect to an external webpage, it can also be used to redirect to another page on your own website. This can allow you to have a page of your website appearing in several places in you site navigation.
Page Content
As the field label suggest, this is where you type in your Page content! Naturally, this field can't be left blank.
You can type your text straight in or use the WYSIWYG Editor. The Editor has its own menu bar that appears at the top of the Page Content entry field:

As you become more familiar with madCMS, you will find the WYSIWYG Editor very useful for formatting your text as well as inserting images and links. [How to use the WYSIWYG Editor]
Note: While it is tempting to create and format your content in MS Word, then cut-and-paste your content from MS Word into madCMS, this may cause some unexpected results on your displayed webpages! Pasting from Word usually results in "dirty" HTML code, which madCMS will happily save and subsequently try to display. If you do want to use MS Word to prepare your content, it is much safer to cut-and-past from Word into a plain text editor (eg: Notepad), then cut-and-paste from the text editior into madCMS. Then use the madCMS WYSIWYG to format your content (eg: add headings and bullet-points).
Add/Replace Quick Image
You can easily add an image to your page without worrying about re-sizing it or positioning it by inserting it as a “Quick Image”.
Simply click on the “Browse” button to locate the image you want to upload and madCMS will do the rest. Your image will be uploaded, re-sized and inserted in your webpage in a pre-determined place and style. The image you upload, however, needs to be a *.jpg file and have a filesize not larger that 1Mb.
The final size, position and style of the image is set by the system – if you want an image to appear otherwise in your Page, it will need to be inserted as a File. [How to upload and insert images as files...]
Linking to other pages and files
You can easily link to other pages of files on your website by inserting a hyperlink using the WYSIWYG Editor. [How to use the WYSIWYG Editor]
Before using the WYSIWYG Editior to link to a file, however, you will first need to upload the file to your website. [How to upload and link files...]
Page status
This drop-down allows you to set the Page to show on your site’s Navigation Menu (Display) or exclude it from showing on the navigation (Hidden). Of course, if a Page has been orphaned, it won’t show on the navigation irrespective of it’s Status because there is no Main Menu Group for it!
Saving Your Page
Don’t forget to save you page, especially if you have used the WYSIWYG editor. Updating the Page Content in the Editor doesn’t update the Page – you need to click on the Add/Update button that appears at the bottom of the Add/Edit Page screen.
Editing Pages
To edit an exisiting Page, list all the Pages by selecting the "All Pages" tab. Of course, if you know the status of the Page you want to edit (eg: "Live" or "Hidden") you can click on those respective tab to just list those files. Once you have the list of Pages, click on the "Edit" icon (the green pencil).

The Edit screen for the Page looks remarkably like the Add Page screen, and you can add or change your content in much the same manner.
Don’t forget to save you page after you have finished editing, especially if you have used the WYSIWYG editor. Updating the content in the editor doesn’t update the Page – you need to click on the Add/Update button that appears at the bottom of the Add/Edit Page screen.
Deleting Pages
To delete an existing Page, list all the Pages then click on the "Delete" icon (the red cross).

A message window will pop up, asking you if you are sure you want to delete. Click on "Yes" and the Page is deleted (it's important to remember you can't undo if you delete). Click on "Cancel" if you have changed your mind and don't want to delete the Page.
If you delete a Page accidentally (oops!) then sorry, you will need to create it again.
Orphan Pages
Orphan pages can result if you delete an entire Main Menu Group, either accidentally or on purpose. All the pages that were associated with the deleted Group will be orphaned.
Unlike pages that have had their status set to “hidden” orphan pages are still visible on your live website. Because the pages are still live, they can still be found by search engines and can still be linked to from other pages, so orphan pages might be gone, but they are not forgotten!
The list any orphan pages on your website, click on the “Orphan Pages” tab.
To tidy up orphan pages, you can choose to delete them or associate them with another Main Menu Group.
If the pages have been orphaned because you accidentally deleted a Main Menu Group, you will need to recreate that Main Menu Group then re-associate all the orphan pages with the recreated group. This is because the recreated Main Menu Group will have a different system ID to the one that was deleted.
 About
About User Manual
